
The Bloodfire Stronghold is a special instance made available during Phase 2 of the Air Saga World Event that holds 6 Bloodfire Stronghold boss encounters. These are available in Level 15, 30 and 60 versions in the same instance.
Check out the guide below for more information on the Bloodfire Stronghold.
Table of Contents:
- Overview
- Accessing the Bloodfire Stronghold
- The Quest + Mount
- The Bloodfire Stronghold Bosses
- Loot
- Achieves
Overview
The Bloodfire Stronghold is a special 5-man instance made available during Phase 2 of the Air Saga World Event.
- There are 6 Bloodfire Stronghold Boss encounters.
- There’s Level 15, 30 and 60 versions in the same instance.
- You can have up to a group of 5 players for the Bloodfire Stronghold.
- They require an Infernal Conduit to summon gained from completing a Bloodfire Behemoth Zone Event.
- They drop Burning Cores used to upgrade a “Torrid Ember”. Upgrading it 50 times turns the Torrid Ember into a Magma Walker mount.
Dev Krug has confirmed that the Bloodfire Stronghold will remain in the game permanently. [r]
Accessing the Bloodfire Stronghold
 A Portal can be found off the coast of Silverwood near Sanctum and in Freemarch near Meridian.
This is a Portal that sends you to the Bloodfire Stronghold instance.
Infernal Conduit

You obtain an Infernal Conduit by completing a Bloodfire Behemoth Zone Event. These zone events can occur in almost any zone and mainly involve finding the zone event boss and defeating him.
The Infernal Conduit is a requirement to enter through the Stronghold Portal into the Bloodfire Stronghold Instance. They are a consumable that are used to summon a random Bloodfire Stronghold boss.
You can use an endless amount of Infernal Conduits whilst in the Bloodfire Stronghold Instance. Try to make sure that your group (of up to 5 players) has at least one Infernal Conduit each.
You can have multiple Infernal Conduits in your inventory.
Tips:
- If you can manage to form a group of 20 players – with at least one person on each shard – you will probably complete achievements/mount faster due to multiple anchors and larger coverage of possible Bloodfire Behemoth zone events. (Don’t go to Seastone though, it’ll split your raid).
- Use Elioty@Zaviel’s Rift Event Watcher. There’s now a specific tracker that lists all Bloodfire Behemoth events that are currently up on all shards.
The Quest + Mount
The Quest

You’ll find an Icewatch Scout NPC near the Stronghold Portal in Silverwood or Freemarch who will give you a quest to collect an Infernal Conduit. Once you have successfully done so and entered the Stronghold Portal, you will receive a ‘diamond icon’ reward with a Torrid Ember (Level 1) item and Eternal Crystallized Insight (PA XP).
The Mount: Magma Walker

The Torrid Ember (Level 1) can be upgraded to Level 50 where it is converted into a Magma Walker Mount . You need an item called Burning Core to upgrade the Torrid Ember. Burning Core drops from Bloodfire Stronghold bosses.
There’s also Burning Core Cinders that act like Burning Cores but require 2 days before they get turned into Burning Cores. You can use Temporal Aligners bought from the Rift Store -> Chests & Keys section to decrease the time, or simply wait out the timer.

Although not shown in the preview, these mounts also have a fire-based glow.
You will need to ALT+click on the Torrid Ember to access its upgrade screen.
The Bloodfire Stronghold Bosses
 The Bloodfire Stronghold instance is within Infernal Dawn’s Maelforge encounter location.
The Areas
There’s 3 locations where you can summon the Bloodfire Strongholds.
- Maelforge’s starting location during Eggs encounter which has Level 15 bosses.
- Up the stairs to the right is a portal that sends you to an area not used during Infernal Dawn that summons Level 30 bosses.
- Up the stairs to the left is a portal that sends you to the top final area of the Maelforge encounter with Level 60 bosses.
 |
 |
 |
The Portals

Each Area has a portal or two that ports you to the other areas. You are auto-mentored down to the level of the area. So if it is an area for Level 15s, you’ll be auto-mentored down to Level 15.
Hovering over the portal will give a tooltip indicating what level the bosses will be in that area.
The Bosses
The Bloodfire Stronghold is not like the Strongholds in The Dendrome. Instead, it’s a single instance with multiple boss fights that are summoned at random with an Infernal Conduit – no add phases, just boss fights (and any adds that are part of the boss fight).
There are 6 boss encounters that you can fight in Level 15, Level 30 or Level 60:
- Swarmlord Ilodron
- Cinduryun & Pyrongryo (Level 60)
- Melidrak
- Renak Ladne (Level 60)
- Charr’Denor
- Warlord De’Ator
Below is a preview of some of the bosses. Any numbers provided below are Level 62 version damage numbers unless otherwise stated. The Level 30 and 15 versions will hit for less.
Swarmlord Ilodron

A Spider boss that hides and summons adds called “Illodron’s Brood” every 25% hp.
It also does Venom Blast rectangular AoE.
Cinduryun & Pyrongyro

This is a twins fight with two mechanical constructs. Cinduryun and Pyrongyro. (Seems to only appear in the Level 60 area).
Imbue Power
There’s an interrupt mechanic for both bosses where they’ll emote something like “Cinduryun concentrates his power on Pyrongyro!” which provides a buff to the boss, increasing the boss’ out-going damage dealt by 25% and reduces damage taken by 15% per stack.
Javelin
They will occasionally cast “Javelin” at a random player that does AoE damage in a red AoE bubble.
Balance Unbalanced
There is a % hp twins mechanic like other twins fights where if they are too different in hp they’ll gain stacks of outgoing damage called “Balance Unbalanced”. 10% damage increase per stack.
Pyrongyro raises his blade!
Pyrongyro will emote “Pyrongyro raises his blade!”. He will aim at a random player and charge towards them dealing ~30% damage along his attack path.
Firestorm
Cinduryun casts “Firestorm” with the emote “Cinduryun calls down a firestorm!”. This creates several swirling Fire vortexes that deal considerable damage if you are in them.
Try not to be in melee or mid-range. Try to run out when Cinduryun casts Firestorm because if you get hit by a Firestorm, it’ll likely kill you.
Raging Flame
Pyrongyro casts a Raging Flame Channel at his location.
Resurrect
If one of the Twins dies, he’ll resurrect to full hp. You’ll still get the kill for that boss – you just need to kill the other boss for both to stay dead. Be extra careful of this. You want the bosses to die at nearly the same time because once one resurrects, their hp difference will be such that “Balance Unbalanced” 10% out-going damage buff stacks on the bosses will start stacking at a rapid pace.
Melidrak

Melidrak is a fire-based drake.
Melidrak Flame
He does a fire-breath attack with emote “Melidrak inhales deeply…”.
Melidrak’s Tear
Melidrak’s Tears are the yellow orbs that spawn around Melidrak. They provide a 5% damage boost per stack but also deals ~3k damage to you when you pick them up (by running over them).
Melidrak’s Seed
At around 20% he flies into the air and casts Melidrak’s Seed, spawning a fire crystal on the ground.
Tooltip states: “An ember laid by Melidrak that will grow into a Ward of Melidrak after 8 seconds. Takes 90% more damage from attacks while growing.”
Ward of Melidrak
Unknown mechanic – will update when info is available. Likely a shield.
Renak Ladne

A pirate like ole’ Rusila Dreadblade! She starts off with an add “Renak’s Cinderling”. (Seems to only appear in the Level 60 area).
Suffocating Sphere
Everyone gets a reactive called “Suffocating Sphere”. Tooltip: “Burn out the oxygen in a small area preventing the reignition of Renak’s Cinderlings. Lasts 10s.” 30sec CD, oGCD.
Basically, Renake’s Cinderlings (she generally has 2) will continuously respawn unless they die whilst within a Suffocating Sphere. These Spheres you can drop at your location and they appear as a blue sphere. Drop them on top of the boss so she is unable to re-summon the adds.
Scorched Earth
Random players gain a ring around them with the Scorched Earth debuff. It is a Red-ish ring. Those with the Scorched Earth ring will deal damage to those with the Flash Point ring. Deals around 1.6k damage per tick.
Flash Point
Random players gain a ring around them with the Flash Point debuff. It is a white ring. Those with the Flash Point ring will deal damage to those with the Scorched Earth Ring. Deals around 1.6k damage per tick.
Dark Energy
Renak will emote “Renak Ladne begins to channel dark energy into the ground. This hits the entire party/raid for several ticks of ~3k damage.
Roaring Flame
“Renak begins to siphon power from her cinderlings….” is emoted during the channel. For every Cinderling that is alive, she gains a 5% out-going damage increase per stack.
Burning Shroud
Occasionally you’ll get a ‘Burning Shroud’ debuff that deals damage each second, per stack.
Charr’Denor

Charr’Denor (aka “Charred Dinner”) is a mechanical construct with a shield mechanic.
WARNING: There’s a current bug where if you wipe, she may not be interactable with anymore (so she just stands there; you can’t attack her, she doesn’t attack you). So make sure you have heals!
Swirling Smoke
She has a 10-stack shield on her that “Shields the Black Lord from all damage.” You need to pick up orbs and use the reactive on her to destroy the shields.
Rolling Ash
This is an AoE attack on a random player. Once the AoE lands, an orb will appear with a blue AoE that you need to pick up. The orb is called Decaying Smoke. Rolling Ash is cast on the furthest player from Charr’Denor so if you want to speed things up you should probably stay as close to her as possible (so you don’t have to run back and forth).
Decaying Smoke
When you pick up an orb that lands after Rolling Ash, you’ll get Decaying Smoke. You get both a debuff and a reactive.
Debuff Tooltip: “Deals incoming Death damage each second. Removed when Decaying Smoke is used on The Black Lord.”
Reactive Tooltip: “Can be used to remove Swirling Smoke from Charr’Denor. Increases damage taken by Charr’Denor by 10% per use, if Charr’Denor is not affected by Swirling Smoke.” Melee Range, oGCD.
Use the reactive you receive on Charr’Denor to remove 2 stacks of her shield.
Legionnaire Adds
She will emote “Charr’Denor shouts, “Legionnaires! Deal with these fools!”” and this will summon two Charred Legionnaires. If you don’t kill the adds they’ll eventually overwhelm you (since she spawns 2 at a time, and doesn’t wait for the previous 2 to die before she summons more).
Charred Blast
This is similar to the other Blast mechanics (a rectangular bowling-alley AoE with a fast-moving wave). Avoid it.
Warlord De’Ator
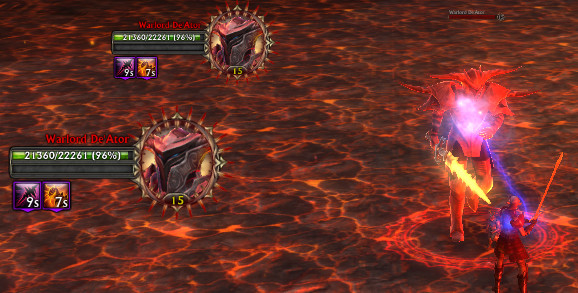
Warlord De’Ator does a few simple mechanics that are easy to dodge. He has a ground phase and an air phase.
Ground Phase
Stand Aside!
Interruptible knock-back.
Wrath of De’Ator
A rectangular AoE blast. Avoid it.
Add
An add may spawn depending on how long it takes you to get him to air phase. Just kill the add.
Other Abilities
De’Ator also does a charge, auto-attack and another attack that doesn’t deal much damage.
Air Phase
Wrath of De’Ator
He will shoot random AoEs at places where players stand. Just move out of the way.
Rain of Fire
He aims at where a player last stood and produces a large AoE where he fires a ton of fireballs into the AoE area. Just move out.
Loot
The bosses seem to have a chance of dropping Level-appropriate essences. They seem to drop with every boss and their quality ranged from beginner tier to in-between Honored and Glorified Torvan/Lycini essences in quality.
Here’s an example:

They also drop the Burning Core that is used to upgrade your Torrid Ember into a Magma Walker mount (as referred to at the start of this guide).
Each boss also drops 120 IS so if you can find a group of 5 players with a ton of Infernal Conduits between them, popping token boosts can get you some nice IS farming.
Achieves

There are multiple Bloodfire Stronghold-related achievements found under Achievements -> Planes -> Fire.
There’s a 5pt achieve for each individual Bloodfire Stronghold boss. There’s also two meta achieves – one for defeating all Bloodfire Stronghold bosses earning you to the title: “Incinerator” and the other for defeating 100 bosses earning you a wardrobe piece and a Relic Crucia’s Supply Crate.
Further Information
That’s the Bloodfire Stronghold bosses for the Air Saga World Event. The Bloodfire Stronghold, Ember Cores, Torrid Embers and Bloodfire Behemoth zone events will remain permanently in the game. [r]
You can find out more information about the Air Saga World Event and walkthroughs for each Arc of the Air Saga questchain below:

Bloodfire Stronghold can be raided. (More than 5 people.)