
The Runic Athenaeum is a large, hidden library in the north-east of Moonshade Highlands sealed off by an Arbiter named Voradrin with the advice of Thontic. Introduced in RIFT with Patch 2.7, The Runic Athenaeum houses many lore books, lore-related quests, soul-based quests and the Storm Legion Tier 3 Bindings of Blood raid encounters. It also brings forth the Hero’s Unrest Rift Lures and related zone events.
Below you will find all the information you will need to know about the Runic Athenaeum and related content including how to get there, where the Tier 3 portals are and complete walkthroughs of all the various quest chains.
Table of Contents:
- Getting There – Starting Quests
- The Runic Athenaeum – Overview
- Main Soul Quests
- Daily Quests
- Hero’s Unrest Rifts
- Storm Legion Tier 3 Raids – Bindings of Blood
- Achievements
Getting There – Starting Quests
Firstly, speak to either Remun Smorkov in Sanctum (Guardians) or Rahn Chuluun in Meridian (Defiants) to obtain the starting Starting Quests for the Runic Athenaeum quest-chain.
(alternatively you can go directly to the Runic Athenaeum using this map here.)
There’s two versions of the first two starter quests – one for Guardians and one for Defiants.
Quest 1: Highlands Research

For Guardians, Speak to Remun Smorkov outside Sanctum near the Statues just after Sanctum Bridge. He will provide you with a quest to speak to Borrin Gammult who is located inside the main Sanctum Building.
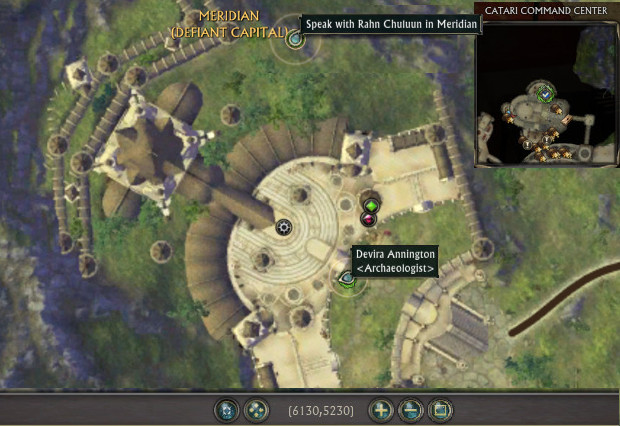
For Defiants, Speak to Devira Annington inside Meridian in the green court-yard. He will provide you with a quest to speak to Rahn Chuluun who is located inside the Meridian Building at the Catari Command Center in the top-right.
Reward
5,040XP + 31g 50s.
Quest 2: To Delve Is To Know (Guardians)

For Guardians, Speak to Borrin Gammult to begin this quest. You are tasked with examining a Dwarven Artifact located right outside the Sanctum bridge.
Upon clicking the Dwarven Artifact you will be ported to Moonshade Highlands at Mistfall Cove. Run forward until you see an NPC called Kovoro Zarlith and speak to him to complete the quest.

For Defiants, Speak to Rahn Chuluun to begin this quest. You are tasked with examining a Dwarven Artifact located outside Meridian.
Upon clicking the Dwarven Artifact you will be ported to Moonshade Highlands at Mistfall Cove. Run forward until you see an NPC called Kovoro Zarlith and speak to him to complete the quest.
Reward
5,040XP + 31g 50s.
Quest 3: Suffer in Soul

Speak to Kovoro Zarlith in Moonshade Highlands to begin this quest. The previous quest, “To Delve Is To Know” should teleport you pretty close to him.
Objectives
– Absorb the power from the first artifact.
– Absorb the power from the second artifact.
– Absorb the power from the third artifact.
– Pass the first obstruction.
– Pass the second obstruction.
– Search for clues 0/5.
– Search for the stranger who inhabits this place.
Walkthrough
– Absorb power from the first artifact.

The First Artifact (Pillar of Wind) is along the pathway behind Kovoro Zarlith. There’s a swirling contraption with 3 Red AoE Cones that constantly spin around in circles. You need to avoid the Cones and click on the artifact.
If you get hit by a red cone, you will port back to a location just before the swirling contraption.
Strategy: Mount up and go through right after a cone passes you.
Note: The swirling contraption won’t stop after you’ve clicked on the artifact so make sure to properly mount through without getting hit by the contraption or else you will get ported back to the start.
However, even if you do get ported back, you can run around the edge and avoid the AoE completely to pass the first artifact contraption (as per the left white arrow in the image above).
– Absorb power from the second artifact.

The Second Artifact (Pillar of Stone) is located to the left past the bridge (don’t go over the bridge yet). Again there’s another Swirling Contraption and an artifact in the middle that you have to click.
Strategy: As per the image above, mount up and make sure that the ‘3/4 pie’ section is on your left when you run through. If you try to run through when the ‘C’ section is on your left you will likely end up hitting the ‘3/4 pie’ section.
You will also need to be quick at clicking on the artifact because the ‘3/4 pie’ section is right on top of the artifact (and so if you wait too long in the middle you are likely to get hit by it and ported out).
You don’t need to get past the contraption to the other side since the Third Artifact is across the bridge.
– Absorb power from the third artifact.

The Third Artifact (Pillar of Time) is located in-between the two bridges. Again you have a Contraption and the artifact in the middle that you have to click.
Strategy: This Contraption is a pulsing AoE that covers the entire area. Very simple pattern. It ‘pulses’ 4 times, then short break, then 4 times, then long break.
You want to mount up, run in and click on the artifact during the long break. So just watch it – find out when the ‘long break’ is and then count 4 pulses -> short break -> 4 pulses then move in.
Note: You need to be very close to the artifact (practically on top) to interact with it.
– Pass the first obstruction.

The first obstruction is at the entrance to The Buried Path cave after you cross the 2nd bridge. Just run up to the entrance and you’ll find a boulder blocking your path. If you are close enough to it, you will receive a reactive called Boulder Punch. Click on it to destroy the boulder and proceed into the cave.
– Pass the second obstruction.

The second obstruction that you find further through The Buried Path cave is a Stone Guardian mob in front of another boulder blocking off the path. At this point you should have become auto-mentored down to Level 15. Kill the mob to destroy the boulder and proceed.
– Search for clues 0/5.
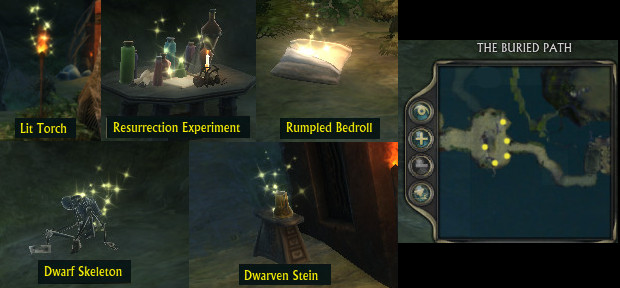
In the next section of the cave, search for clues by interacting with them. There’s 5 in total marked on the mini-map as shown above. They are all on the ground floor so you don’t need to go into the underwater tunnel.
– Search for the stranger who inhabits this place.

Once you’ve collected all clues, speak to the stranger at the end of the long, winding tunnel in the Runic Athenaeum. (don’t go to the underwater tunnel). Voradrin will hand you all the soul quests, lore quests, dailies and Hero’s Unrest quests from this location.
Reward
5,040XP + 31g 50s.
This concludes the starting quests that lead to the Runic Athenaeum. Once you’re at Voradrin he will provide you with a long quest-chain as well as a daily. You can find more information about them below:
The Runic Athenaeum – Overview
The Runic Athenaeum is the area where you can access Storm Legion Tier 3 Raids: Bindings of Blood (“BoB”) as well as a place that houses a variety of Soul quests and other lore quests in Moonshade Highlands.
- There’s a Porticulum on the bottom floor – make sure to speak to the Porticulum Master so you can port to Runic Athenaeum easily in the future.
- Voradrin in the middle of the area will provide you with a variety of soul quests and other lore-based quests for you to complete.
- You can obtain Hero’s Unrest Rift Lures from Bvaldi in the corner.
- There are portals to the Storm Legion Tier 3 Raids on the Main and Top Floors.
Runic Translocator

You’ll need to click on the Runic Translocators located at the sides of the main floor to access the top floor where BoB: Greenscale and BoB: Akylios portals are. Some of the quests may also require you to go to the Top Floor.
Main Soul Quests
The Main Soul Quests are all obtained from Voradrin at the Runic Athenaeum. The Main Soul Quests are quest-chains for the 4 Patch 2.7 Souls: Arbiter, Physician, Liberator and Oracle that are accessible by all players (i.e. not Calling-specific).
We have split the quest walkthroughs into 4 sections for ease of reading and load considerations. Each section is associated with one of the souls. At the end of each soul’s quest chain you will be rewarded with an achievement, a title and the soul’s Cape costume, amongst other rewards.
You will need to do the quests in order: Arbiter -> Physician -> Liberator -> Oracle.
Arbiter Soul Quests

These quests will reward you with the achievement “Hand of Judgment”, the suffix title: “The Judge” and the Arbiter Cape costume.
- Quest 1: The Runemasters That Were
- Quest 2: Runic Recall
- Quest 3: Runic Rebound
- Quest 4: A Rift A Minute Wide
- End of Arbiter Soul Quests.
Guide to the Arbiter Soul Quests
Physician Soul Quests

These quests will reward you with the achievement “Love Heals All”, the suffix title: “The Pain Killer” and the Physician Cape costume.
- Quest 1: And Then There Were None
- Quest 2: The Lost Word
- Quest 3: Akvan Prophet
- Quest 4: The Lost Rune
- Quest 5: A Rune By Any Other Name
- End of Physician Soul Quests.
Guide to the Physician Soul Quests
Liberator Soul Quests

These quests will reward you with the achievement “Mind and Body”, the suffix title: “The Dynamo” and the Liberator Cape costume.
- Quest 1: The Warrior’s Dilemma
- Quest 2: Conquest of the Old World
- Quest 3: These Lines Are Made For Crossing
- Quest 4: Mad Respect
- End of Liberator Soul Quests.
Guide to the Liberator Soul Quests
Oracle Soul Quests

These quests will reward you with the achievement “An End Unforeseen”, the suffix title: “The Far-Seer” or “The Far-Seeress” and the Oracle Cape costume. Players have been reporting that you need to be Level 60 to begin the Oracle Soul Quest chain.
- Quest 1: Broken Circle
- Quest 2: Daughters of Doom
- Quest 3: Breaking Teeth
- Quest 4: Stairway to Oblivion
- End of Oracle Soul Quests.
Guide to the Oracle Soul Quests
Daily Quests
There’s a bunch of daily quests obtained from Voradrin. They involve killing mobs in the cave prior to the Runic Athenaeum, reading up on some of the books in the library and gathering various items around the area.
The dailies are on a random rotation with one available per day.
Quest: Para-Elemental Hybrids (Daily)

Objectives
– Gather Fatemarked Orchids 0/10
– Gather Stonerot Ore 0/8
– Collect Kupalkan Roots 0/8
Walkthrough
Fairly simple – just run into the cave and kill Kupalkan Creeper mobs and loot them for Kupalkan Roots, interact with Rotting Stones for Stonerot Ore and interact with Fatemarked Orchids for Fatemarked Orchids.
Note: You need to click on an actual stone piece to interact with Rotting Stone. You’ll notice the ‘interact’ cursor disappears if your mouse isn’t directly over a stone.
Reward
250,000PA XP + 6,720XP + 31g 50s.
(thanks to Hyolioa for keeping us updated with past changes to the reward provided).
Quest: Encyclopedia Runica (Daily)

Objectives
– Collect History of Morana Markings
– Collect A Rusalkan Bestiary
– Collect Stribog Sisters’ Aerodynamic Studies
– The Veles Parallels
– The Kupala Extinction
Walkthrough
Read the various books on the ground and upper floors as per the above image.
Return to Voradrin to complete the quest.
Reward
250,000PA XP + 6,720XP + 31g 50s.
(thanks to Hyolioa for keeping us updated with past changes to the reward provided).
Hero’s Unrest Rifts

The introduction of the Runic Athenaeum content in Patch 2.7 has also brought with it new lures for each Plane called “Hero’s Unrest – [Plane]”. These new lures cost 800 planarite each or 15 Credits (13 for Patrons) each and are found from:
- Bvaldi <Rift Lures> NPC at the Runic Athenaeum; or
- Rift Store (default key “]“)-> Rifts (top area where the Sinister Tide and Invasive Species Lures are found).

These lures can be opened in any zone when you are near a Rift Tear and are used for the “A Rift A Minute Wide” quest which is part of the Arbiter Soul questchain. They can be opened even without the quest as general use rifts.
The Heroes of the Past
Each of the “Hero’s Unrest” Rifts show 3 Heroes or NPCs of the past. These NPCs relate to the storyline surrounding the Tier 3 Raids, Runic Athenaeum soul and lore quests as well as from related zone events.
The Avatars
Each “Hero’s Unrest” Rift has an Avatar of [Plane] at the end. Each NPC makes it clear that something is amiss – they feel they have ‘forgotten’ some of their memories and none of them recognise the Avatars of the Planes. During the “A Rift A Minute Wide” quest, you will be able to partially find out what is going on.
Storm Legion Tier 3 Raids – Bindings of Blood

The Storm Legion Tier 3 Raids, also known as “Bindings of Blood” (“BoB”), are accessed by portals in the Main and Top Floors of the Runic Athenaeum. The Tier 3 Storm Legion Raids consists of 4 raid encounters: Greenscale, Akylios, Laethys and Maelforge.
BoB: Greenscale and BoB: Akylios were introduced on the 16th April 2014. BoB: Laethys and BoB: Maelforge are slated during the Patch 2.7 release cycle (not launch). The raids require at least 600 HIT (DPS/Heals) and 600 TOUGHNESS (Tanks).
Tier 3 Entrance Portals

Tier 3 Entrance Portals are in the Runic Athenaeum. 3 of them (Greenscale, Akylios and Laethys) are on the Top Floor accessed by clicking on a Runic Translocator on the Main Floor which will teleport you up there. Maelforge’s portal is currently on the Main Floor – although he may end up in the bottom-right corner of the Top Floor once he arrives on the Live shards.
- Hovering over the portals will show you which encounter you are entering.
- Each encounter has a mini-boss and then the boss encounter.
You can check out some more information on each encounter below:
- Bindings of Blood: Greenscale [Kill Videos]
- Bindings of Blood: Akylios [Kill Videos]
- Bindings of Blood: Laethys [Kill Videos]
- Bindings of Blood: Maelforge [Kill Videos]
Achievements

There’s 4 achievements to be obtained with title rewards based on the main Soul Story quests. Titles are: The Far-Seeress, The Judge, The Pain Killer and The Dynamo.
Hand of Judgment
Obtained from completing the “A Rift A Minute Wide” quest which is the last of the Arbiter soul quests. You are rewarded with title: “The Judge”.
Love Heals All
Obtained from completing the “A Rune By Any Other Name” quest which is the last of the Physician soul quests. You are rewarded with title: “The Pain Killer”.
Mind and Body
Obtained from completing the “Mad Respect” quest which is the last of the Liberator soul quests. You are rewarded with title: “The Dynamo”.
An End Unforeseen
Obtained from completing the “An End Unforeseen” quest which is the last of the Oracle soul quests. You are rewarded with title: “The Far-Seeress”.
Missed out on anything else with Patch 2.7? Check out our “A Look Back: RIFT Patch 2.7 – Binding of Blood” article!

Thanks so much for this. Didn’t think these quests were going to be so good. Honestly haven’t enjoyed questing this much since Ember Isle 0_0.
When can you pick up the Liberator quest ‘The Warrior’s Dilemma?’ I finished the first two segments, but Voradrin only offers dailies now. Is there some sort of level or storyline prerequisite in order to start the Liberator quest chain?
Each quest chain increases in level requirement as you go through them. Looking at the mobs surrounding the Liberator quest chain, you probably need to be at least Level 48 or 50 to do it.